Guitar tablature, or tab, is a quick and easy way to learn how to play your favorite songs. It is a written form of musical notation indicating finger locations rather than the pitch of notes. It is a written graphical representation of the strings and frets of a guitar along with a variety of symbols indicating where to fret the notes and chords. In short, tablature maps out where to place your fingers to play chords and melodies.
A full understanding of your guitar's anatomy and the guitar string names and numbering system will aid in your understanding of tablature. Please take a look back at the Guitar Anatomy lesson and The Fretboard lesson.
Let's take a look at a single measure of sample tablature.
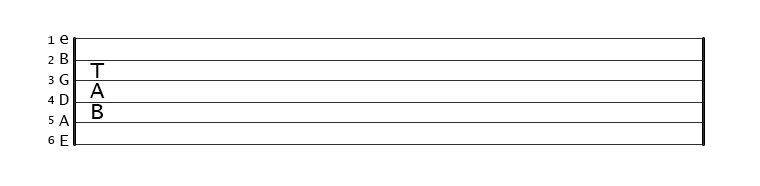
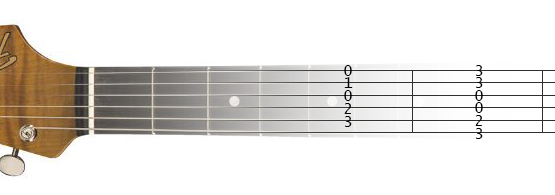
The six horizontal lines on the tablature represent the six strings of your guitar. At the far left, you will see the name and number designations of these six strings, which are not typically a part of traditional written tablature, but I have placed them here for better understanding during this introductory lesson. As you can see tab is simply a graphical representation of your guitar neck and strings. A picture is worth a thousand words, so let’s look at the sample tablature next to an image of a guitar neck for more clarity.
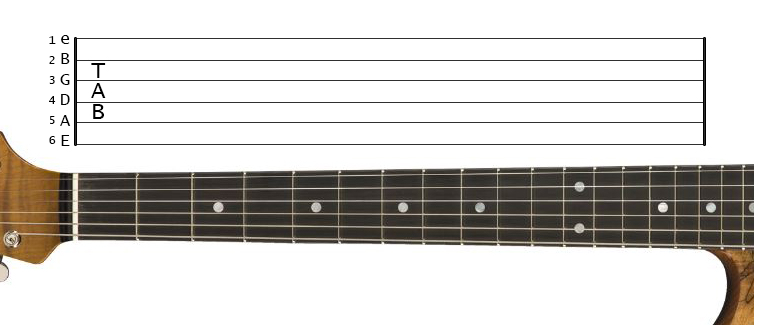
As the image reveals, tablature is simply graphical representation of your guitar strings with the low E string at the bottom of the tab and your high E string at the top. Tab is essentially a guide map telling you which fret and string combination to play. Let’s dig deeper and check out the tablature notation you will find.

Ok, so how do we read this and apply it? It's surprisingly simple. Locate the green number 2 on the tablature. It is located on the A or 5th string. This number and string pair represents the 2nd fret location on the A or 5th string on the guitar, shown to you here as a green circle on the guitar image. You fret or stop the A string at the 2nd fret and pluck the string only once. The same goes for the other notes, color coded for easy identification. From this example we see that single notes are represented by one number on one string, and they are played individually in sequential order from left to right. This represents melody.
Let’s check out an easy melody with a traditional example of tablature notation and without the aid of the string names and numbers.
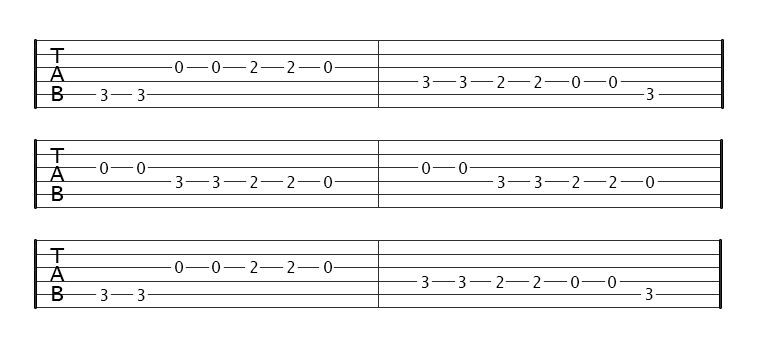
Twinkle, Twinkle Little Star, as it is mapped here, is a combination of fretted and open strings. The tab is read and played from left to right. There are 6 bars or measures in this example, each separated from the previous one by a vertical line. The first measure guides the player to fret the A/5th string at the third fret, and pluck twice. Then pluck the open G/3rd string twice. Then fret the G/3rd string at the second fret and pluck the string twice. Finally a single pluck on the open G/3rd string finishes out the measure. This is an example of a melody. Single notes played in sequence. The rest of the measures should be easy for you to comprehend. They are played using the same technique as described for the first measure.
When you see numbers on tablature stacked up on top of each other it represents a chord, and the notes are meant to be played all at once. This represents harmony. The following is an example of harmony in tablature notation. The numbers represent open strings or fret and string locations, and all are played at the same time.

Songs are made up of harmony (chords) and melody (individual notes in sequence), as in the following more advanced version of Twinkle, Twinkle Little Star.
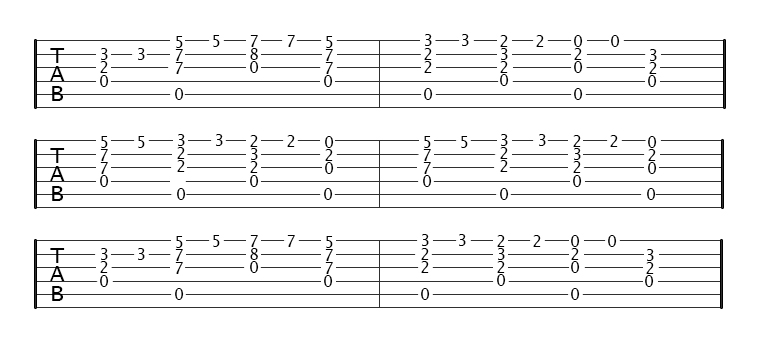
This advanced sample is a combination of chords (harmony) and single notes (melody). Often times two separate guitars are employed to handle the harmony and melody separately, but it is possible to perform them both at the same time as notated here. This can be a bit difficult when first starting out. Learning chords is a discipline in and of itself. The first chord of the first section is made up of three notes which when played harmonically, all at the same time, sounds a D5 chord in the open position.

You can learn more about how to fret chords in the Chords 101 lesson.
Traditional tablature notation is most often presented with standard notation written above it as in the following example. This is beyond the scope of this introductory lesson, as standard notation involves advanced topics such as key and time signatures, music staffs and clefs, and pitch notation. We will touch on this in my Intro to Theory lesson.

To learn more about how interpret and play songs using tablature, check out this video from Berklee Online.
Now that we have a basic understanding of tablature let’s take a look at some of the more common symbols that you will see when using tablature to learn your favorite songs.
Palm Muting and Muted Notes
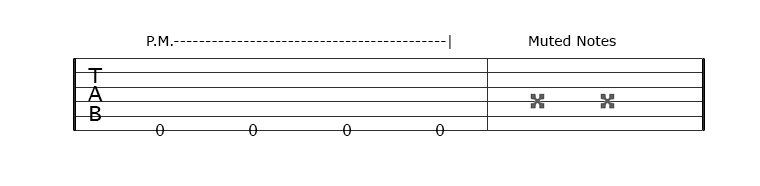
The first element I want to go over with you is palm muting. Palm muting is represented by a “P.M.—“ marker.
The little dashes represent how long you should continue to palm mute the notes. Dead notes, or muted notes, are represented by an “x” on a particular string. When you see a dead note you
should mute the note with either your left or right hand and play that note so the pitch is completely muted. This happens
a lot in strumming patterns and raked parts of lead lines.
Bending
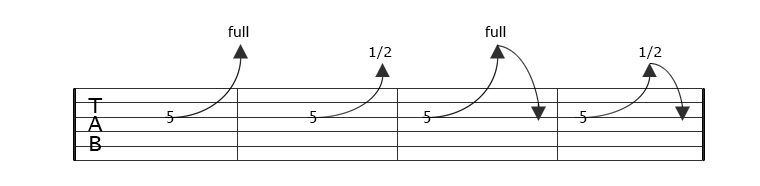
Bending is a pretty common element of Tab. You can tell that you are supposed to bend a note by an upward pointing
arrow next to one or more numbers. The distance you are to bend the note will be defined by an indicator next to the arrow.
It might be a “full” bend or a “1/2” bend. Once you are exposed to a couple of bends you will quickly catch on to the basic idea.
Sliding
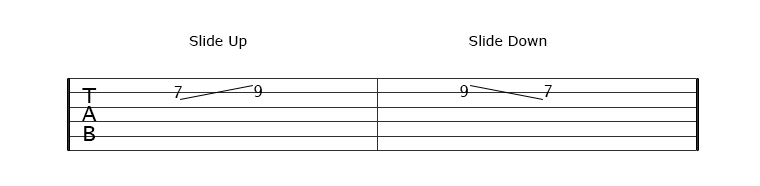
Sliding on the guitar is represented by a fret number, a line, and then another fret number. The line will be slanted up or down
depending on if you are sliding from a higher pitch to a lower pitch or vice versa.
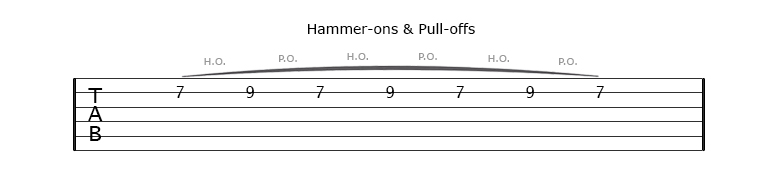
Hammer-ons & Pull-offs
You can identify hammer-ons and pull-offs by a little slur or arc between two or more adjacent notes. It can take a while to get
to where you can quickly interpret this, but once you are exposed to a few musical situations like this you will get the idea.
Vibrato
Vibrato is when you repeatedly bend and release a note over and over for an expressive vocal effect. This is usually represented
by a squiggly line over a note. You can tell how intense or wide the vibrato should be by the thickness or boldness of the squiggly line.

Downstrokes & Upstrokes
Downstroke indicators look like a squared off upside down “U”, and upstrokes indicators look like a downward facing arrow. If the
composer wrote a piece of music with a specific picking pattern in mind you will see picking indicators. If they didn’t you will not
see any indicators and be free to experiment with your own picking patterns.
